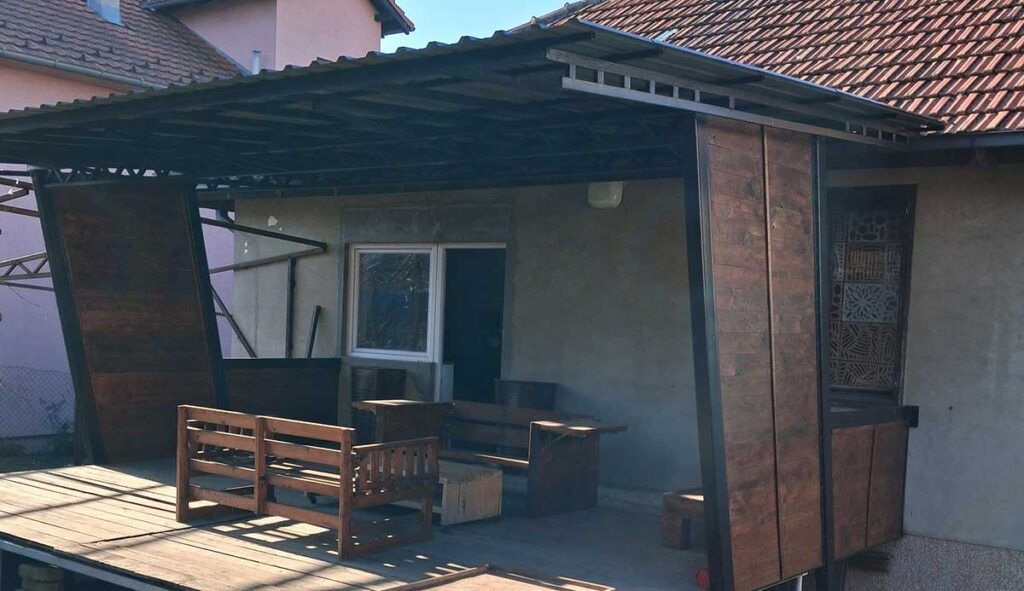
Best Tools and Materials for Backyard Covered Porch – DIY Guide
When I first started planning my freestanding covered porch in the backyard, one of the biggest decisions was choosing between a wood frame and a metal frame construction. I spent weeks researching and weighing the options, because the frame is the backbone of the entire structure—posts, beams, rafters—and it directly impacts durability, cost, maintenance, and how the porch holds up over time.
Why I Considered a Wood Frame First
Wood felt like the natural choice at the beginning. It’s what most homeowners use for porches, decks, and pergolas, and I already had a solid set of woodworking tools (circular saw, drill, level, etc.) from previous backyard projects. Wood frames are straightforward to build if you’re comfortable with basic carpentry.
Pros of wood framing for a backyard covered porch:
- Lower upfront material cost—pressure-treated lumber or cedar is often cheaper per foot than steel tubing or beams.
- Easier to work with if you have only wood tools—no need for specialized metal-cutting or joining equipment.
- Warmer, more traditional look that blends seamlessly with rustic or farmhouse backyard designs.
- Better natural insulation properties (wood doesn’t conduct heat/cold as aggressively as metal, so it feels less “cold” underfoot or in winter).
Cons that made me hesitate:
- Wood requires regular maintenance: staining, sealing, and checking for rot, warping, or insect damage, especially in humid or rainy areas.
- It’s vulnerable to weather extremes—UV fading, moisture rot, and pests like termites can shorten its lifespan without diligent care.
- Less strength for longer spans or heavy snow loads compared to metal, meaning you might need thicker (and pricier) beams.
I almost went with a full wood frame (like pressure-treated 6×6 posts and 2×10 beams), but after talking to a few neighbors with older porches and reading real-user experiences, I realized wood could mean more long-term hassle and potential repairs.
Why I Ultimately Chose Metal Frame Construction
In the end, I decided on a metal frame (steel tubing for posts and beams, with metal roofing). The switch made sense for longevity and low maintenance—exactly what I wanted for a “set it and forget it” backyard upgrade.
Pros that won me over for metal:
- Superior durability—no rot, warping, insects, or fire risk like wood.
- Better resistance to high winds, heavy rain, and UV exposure; it holds up in harsh weather without constant upkeep.
- Cleaner, more modern look that pairs perfectly with corrugated metal roofing for a sleek, industrial-farmhouse vibe.
- Longer lifespan—many metal structures last 50+ years with minimal intervention.
Cons I had to accept:
- Higher initial cost for quality steel materials.
- Requires different skills and tools—cutting and joining metal isn’t like woodworking.
- Slightly more conductive (can feel hotter in summer or colder in winter), though this is minor under a roof.
The Three Essential Tools I Had to Buy
Since my garage was stocked only for wood projects, switching to metal meant investing in three key quality tools. I didn’t want cheap knockoffs that would fail mid-build, so I researched beginner-friendly, reliable options and spent wisely.
Welding Machine (Stick/MIG Welder) I went with a versatile beginner MIG welder (around 140–200 amps) that handles flux-core wire for outdoor use—no gas needed. It allowed me to weld steel tubing joints securely for the posts and beams. Without it, bolting everything would have been weaker and uglier.
(Disclosure: This site participates in the Amazon Services LLC Associates Program, an affiliate advertising program designed to provide a means for sites to earn advertising fees by linking to Amazon.com and affiliated sites. If you purchase through these links, we may earn a small commission at no extra cost to you.)
Small Angle Grinder (4.5-inch) This became my go-to for grinding welds smooth, removing rust, and light cutting. I chose one with variable speed and a good guard for safety—essential for cleaning up metal edges on the porch frame.
Bosch GWS8-45 4-1/2 In. Angle Grinder – $49.00
Metal Chop Saw (or Abrasive Cut-Off Saw) For precise, straight cuts on steel tubing and beams, I got a 14-inch abrasive chop saw. It makes quick, clean work of thick metal without excessive sparks or mess (compared to a hacksaw). A cold cut saw would have been nicer for zero sparks, but the abrasive version was more budget-friendly for my one-time build.
DEWALT Chop Saw, 14-Inch (D28730) – $219.99
14-Inch 10-Pack Abrasive Cut Off Blades, Metal Cutting, Chop Saw Blades – $37.99
These three tools added about $400–600 to my budget, but they made the metal frame possible and will serve for future projects. The result? A rock-solid, low-maintenance backyard covered porch that looks great and handles weather like a champ.
If you’re debating wood vs. metal for your own freestanding porch materials, think about your long-term goals—beauty and ease now, or strength and minimal upkeep for decades.
Essential Materials for Building a Backyard Covered Porch
In my freestanding covered porch project, the choice of materials was crucial for creating a durable, low-maintenance outdoor structure that could withstand weather while keeping costs reasonable. After deciding on a metal frame (as detailed in the previous section), I focused on reliable, readily available supplies that balance strength, affordability, and ease of installation for a DIY backyard build.
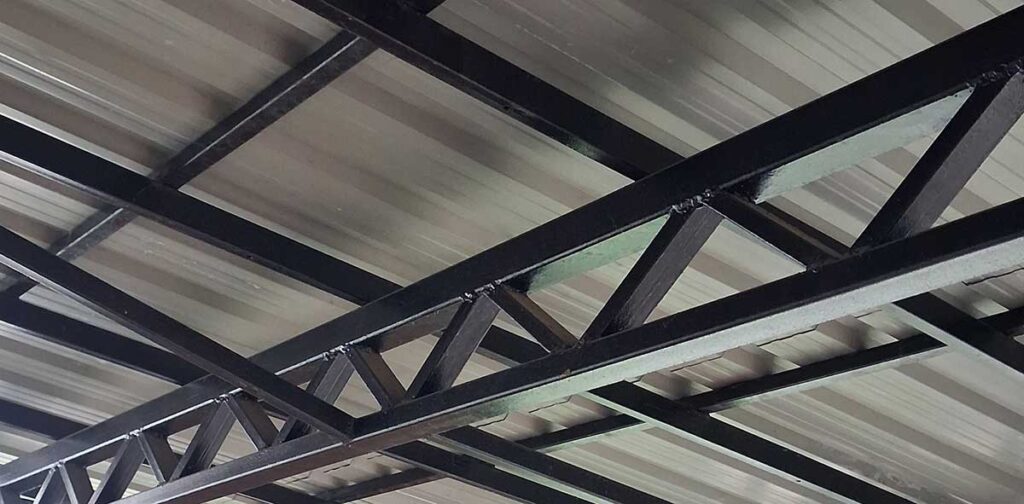
The core structural elements relied on rectangular steel tubing for the frame. In the US market, common sizes like 2 x 1 inch (approximately 50.8 x 25.4 mm) and 2 x 1.5 inch (50.8 x 38.1 mm) rectangular tubing with a 0.083-inch wall thickness (about 2.11 mm, close to 2 mm European equivalent) worked perfectly for posts and beams. I used similar profiles for the main supports—strong enough for spans and loads, yet lightweight compared to heavier wood alternatives. These HSS (Hollow Structural Sections) tubes (ASTM A500 grade) provide excellent rust resistance when primed and painted, making them ideal for long-term outdoor use without constant upkeep.
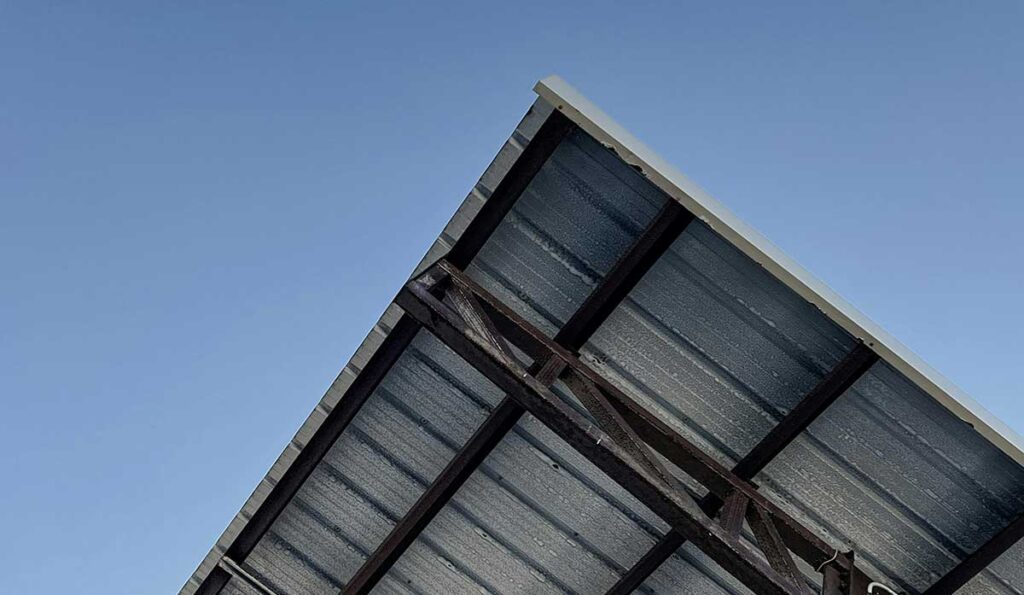
For the roof, I went with corrugated galvanized metal panels—a popular and practical choice for US backyard porches and patios. These lightweight sheets (typically 26–29 gauge) offer superior rain shedding, wind resistance, and UV protection, while allowing for a low-slope design. They’re affordable (around $1.50–$3 per square foot), easy to cut and install with self-tapping screws, and give that clean, modern-farmhouse look I wanted.
The foundation required solid concrete footings to anchor the posts securely. I poured simple pier-style footings using standard pre-mixed concrete (like Quikrete or Sakrete bags) in 8–12 inch diameter holes dug below the frost line (or at least 12–24 inches deep depending on local codes). Each footing included a metal post base (e.g., Simpson Strong-Tie adjustable bases) to elevate the steel posts and prevent direct ground contact, reducing corrosion risk.
Finally, for the railing and finishing touches, I used pressure-treated pine boards—a classic, budget-friendly option widely available at Home Depot or Lowe’s. These treated lumber pieces (typically 2×4 or 2×6 for rails and balusters) resist rot and insects, making them perfect for porch railings in humid or rainy areas. I stained them for extra protection and a natural look that complements the metal frame.
Overall, these materials kept the project straightforward, cost-effective, and built to last—turning my backyard into a reliable outdoor room.
Structural Materials: Rectangular Steel Tubing
When selecting tools and materials for backyard covered porch construction, the structural frame is the most critical part. After weighing wood versus metal, I chose rectangular steel tubing for its strength, longevity, and low-maintenance qualities—ideal for a freestanding covered porch that needs to handle wind, rain, and occasional heavy loads without warping or rotting over time.
In the US market, rectangular steel tubing (commonly called rectangular HSS or Hollow Structural Sections, ASTM A500 Grade B) comes in standard inch dimensions. I matched my European metric sizes to the closest US equivalents, which are widely available at suppliers like Metals Depot, Home Depot Pro, or local steel yards. All tubing had a wall thickness of 0.083 inches (≈2.11 mm) except for the largest beams, which used 0.120 inches (≈3 mm) for extra rigidity.
Here is the exact list of rectangular steel tubing I used for the porch frame, with US inch sizes first (most common for American DIYers), followed by the metric equivalents I actually sourced, and wall thickness:
| US Size (inches) | Metric Equivalent (mm) | Wall Thickness | Used For |
|---|---|---|---|
| 1 × 1 | 25 × 25 | 0.083 in (2.11 mm) | Smaller cross-bracing & rail supports |
| 1-1/4 × 1-1/4 | 30 × 30 | 0.083 in (2.11 mm) | Intermediate posts & short beams |
| 1-1/2 × 3/4 | 40 × 20 | 0.083 in (2.11 mm) | Horizontal rafters & lighter spans |
| 1-1/4 × 3/4 | 30 × 20 | 0.083 in (2.11 mm) | Diagonal bracing & trim pieces |
| 2 × 1-1/4 | 50 × 30 | 0.083 in (2.11 mm) | Main horizontal beams |
| 2 × 2 | 50 × 50 | 0.083 in (2.11 mm) | Vertical main posts |
| 5 × 1-1/2 | 120 × 40 | 0.083 in (2.11 mm) | Side frame |
| 5 × 3 | 120 × 80 | 0.120 in (≈3 mm) | Primary ridge beam & heavy-load girders |
These sizes gave me the perfect combination of strength and weight. The 2 × 1 inch and 2 × 2 inch tubing handled the majority of the vertical and horizontal loads, while the larger 5 × 3 inch (120 × 80 mm) beam across the top provided rock-solid support for the corrugated metal roof without sagging. The thinner wall (0.083 in / 2.11 mm) kept costs down and made welding easier, while the thicker 0.120 in on the biggest piece ensured no flex under full load.
Using rectangular steel tubing for backyard covered porch frames also allowed clean, precise welds (with the MIG welder and angle grinder I bought specifically for this project) and eliminated the need for oversized wood members. All pieces were primed with rust-inhibiting paint and top-coated for extra protection against the elements.
If you’re gathering tools and materials for backyard covered porch projects, start with these common rectangular HSS sizes—they’re reliable, code-compliant in most areas (check local requirements), and deliver professional results on a DIY budget.
Foundation: Concrete Piers and Metal Post Anchors
One of the most important decisions when gathering tools and materials for backyard covered porch projects is building a rock-solid foundation. For my freestanding covered porch, I raised the entire structure about 28 inches (roughly 70 cm) above ground level. This elevation improves airflow underneath, prevents moisture buildup, deters pests, and gives the porch a more substantial, room-like feel—perfect for turning the backyard into a true outdoor living space.
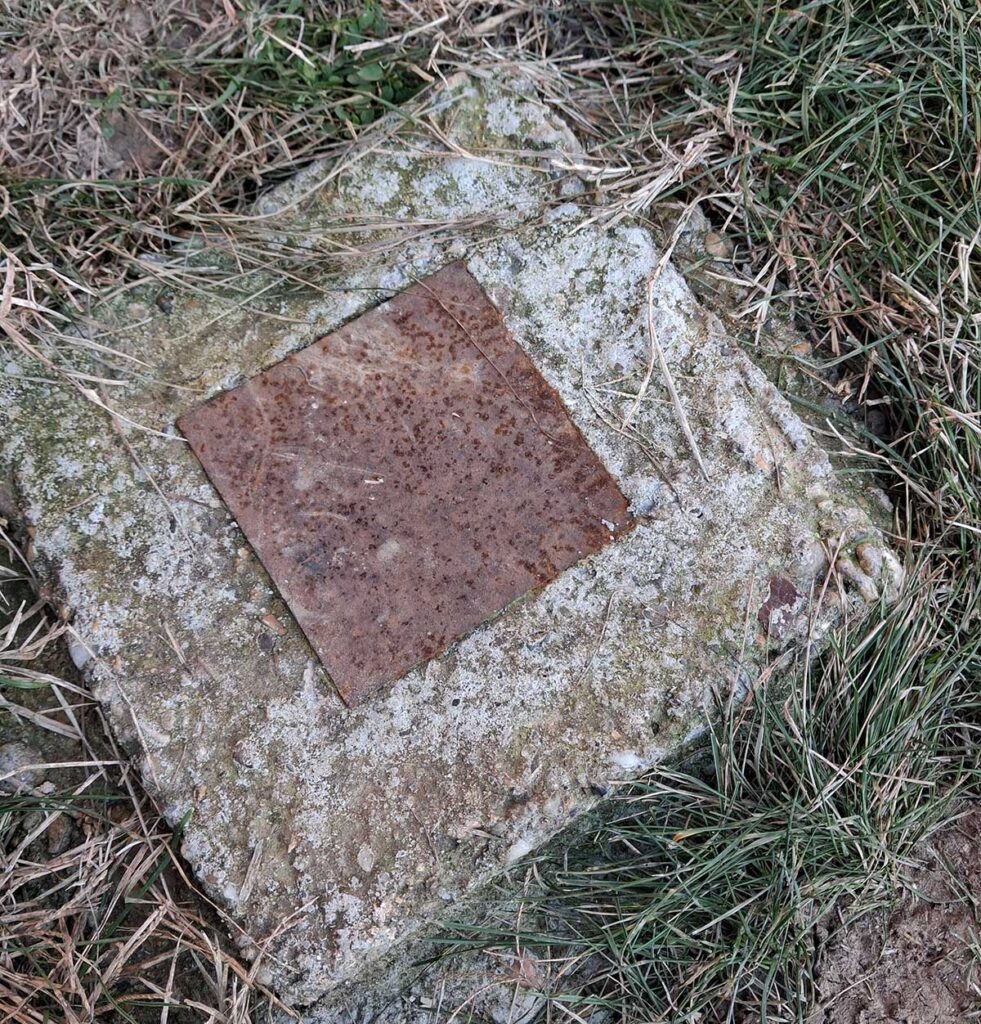
The foundation consists of concrete piers (also called poured concrete footings) combined with metal post anchors (adjustable base plates).
For each pier, I used standard pre-mixed concrete (like Quikrete 5000 or Sakrete High-Strength bags) mixed in a wheelbarrow or portable mixer. I poured the concrete into sonotube forms (cardboard tubes) for a clean, cylindrical shape, then inserted a metal post anchor (Simpson Strong-Tie ABA or similar adjustable base) into the wet concrete while it was still workable. These galvanized steel bases have threaded rods or bolts that allow precise leveling and height adjustment—crucial since the porch deck sits 28 inches up. Once the concrete cured (usually 24–48 hours for initial set, 28 days for full strength), the rectangular steel posts were welded directly to the base plates, creating an incredibly strong connection that transfers all loads straight into the ground.
Having 30 piers might sound like overkill for a typical backyard porch, but it distributed the weight evenly across the 12×16-foot footprint (or similar size), eliminated any bounce, and provided peace of mind in case of heavy snow, wind, or future additions like a ceiling fan or string lights. The elevated design also made it easier to run electrical conduit or drainage underneath if needed later.
Overall, this foundation method—concrete piers with metal post anchors—is one of the most reliable ways to build a raised backyard covered porch. It’s straightforward for DIYers, requires only basic mixing tools (shovel, level, trowel), and ensures the entire welded metal frame stays level and secure for decades.
Roofing Materials – Best Options for Shade and Rain Protection
When gathering tools and materials for backyard covered porch projects, the roofing choice is one of the most important decisions for comfort and usability. I learned this the hard way during my freestanding covered porch build.
At first, I installed clear polycarbonate panels (often called Lexan or similar multiwall sheets) as the roof. My reasoning was simple: I wanted maximum natural light to keep the space bright and inviting, almost like an open-air room. These panels are lightweight, easy to cut and install with basic tools, and they let in plenty of daylight—perfect in theory for a backyard entertaining area.
But once summer hit, it became clear I had made a big mistake. The sun’s rays passed straight through the transparent sheets, turning the porch into a greenhouse. The heat trapped underneath was intense—temperatures felt 10–15°F hotter than the open yard, making it nearly unbearable to sit there during the afternoon. Even with good ventilation, the radiant heat from direct sunlight made the space uncomfortable rather than relaxing. What I thought would be a bright, airy benefit ended up being a major drawback for daily use.
After a few miserable hot days, I decided to remove the polycarbonate panels entirely. I replaced them with corrugated galvanized metal roofing—a classic and highly effective option for backyard covered porch designs. The metal sheets block nearly all direct sunlight while still allowing some diffused light through the gaps if needed. Now the porch stays noticeably cooler throughout the day, with excellent shade and full rain protection. Water runs off quickly thanks to the corrugations, and the material is durable, low-maintenance, and affordable.
The switch transformed the space from a heat trap into a true outdoor room I can enjoy year-round. If you’re choosing roofing materials for backyard covered porch, prioritize solid shade over maximum light—especially if you live in a sunny climate. Metal roofing (galvalume or painted steel) is one of the best long-term options for comfort, protection, and value.
Finishing Materials: Pressure-Treated Pine Boards for Railings and Flooring
When it comes to tools and materials for backyard covered porch projects, the finishing touches—like railings and flooring—make the space feel complete, safe, and inviting. For my freestanding covered porch, I chose pressure-treated pine boards as the ideal material for both the railings and the deck floor. Pressure-treated lumber is widely available in the US (at Home Depot, Lowe’s, or local lumber yards), resists rot, insects, and fungal decay, and offers excellent value for outdoor applications in humid or rainy climates.
For the railings (balusters, top and bottom rails, and posts), I used pressure-treated pine boards that were planed on all four sides (S4S – surfaced four sides). This gave a smooth, splinter-free finish that looks polished and feels comfortable to the touch. The boards came in two widths:
- 4-1/2 inches wide (approximately 11 cm)
- 5-1/2 inches wide (approximately 14 cm)
Both were 3/4 inch thick (about 2 cm). The 4-1/2-inch boards worked perfectly for vertical balusters (spaced to meet code requirements—usually no more than 4 inches apart), while the wider 5-1/2-inch boards formed the top and bottom horizontal rails for added strength and a clean look. I stained these boards with a semi-transparent exterior stain to enhance the natural grain while adding extra UV and water protection.
For the flooring (deck boards), I opted for the same pressure-treated pine but in a thicker profile:
- 4-1/2 inches wide (approximately 11 cm)
- 2 inches thick (about 5 cm)
These were rough-sawn (not planed on all four sides). I chose the rougher finish for two practical reasons. First, the extra thickness (2 inches instead of the standard 1 inch or 5/4 decking) provided much greater stiffness and reduced bounce across the 28-inch elevated deck—important for a comfortable walking surface over a larger span. Second, smooth, planed boards can become dangerously slippery when wet from rain or morning dew, especially with shoes or bare feet. The rough texture offers better grip and traction, making the porch safer for family gatherings, kids playing, or evening use.
All boards were rated for ground contact (UC4A or better treatment level) to handle occasional moisture splash from the yard. I left small gaps (about 1/8 inch) between floor boards for drainage and airflow, and secured them with corrosion-resistant deck screws. After installation, I applied a water-repellent sealer to extend the life and maintain the natural color.
Using pressure-treated pine for both railings and flooring kept the project budget-friendly while delivering durability and safety. It’s one of the most reliable finishing materials for backyard covered porch builds—easy to work with basic tools, code-compliant in most areas, and perfect for creating that inviting outdoor room feel.
Wrapping Up: Your Complete Guide to Tools and Materials for Backyard Covered Porch
Building a freestanding covered porch transformed my backyard into a versatile outdoor oasis, and selecting the right tools and materials for backyard covered porch projects was key to its success. From debating wood vs. metal frames to finalizing the elevated deck and railings, every choice prioritized durability, cost-efficiency, and ease for DIY beginners.
Recap the essentials: The rectangular steel tubing frame (US sizes like 2×1 inch and 5×3 inch HSS with 0.083-inch walls) provided unmatched strength without rot—perfect for backyard covered porch frame materials. Anchored on 30 concrete piers with metal post anchors (using Quikrete mix at ~$5–$8 per 80-lb bag), the 28-inch raised design ensured stability and airflow. Corrugated galvanized metal roofing (~$1.50–$3 per sq ft in 2026) delivered superior shade after ditching heat-trapping polycarbonate panels, while pressure-treated pine boards ($2–$5 per sq ft) for railings (4-1/2″ and 5-1/2″ wide, S4S) and rough-sawn flooring (4-1/2″ wide, 2″ thick) added safety and grip.
Don’t forget the essential tools for backyard covered porch I upgraded for metal: a MIG welder (~$300–$500), 4.5-inch angle grinder ($50–$100), and chop saw ($150–$300). These made precise cuts and welds possible, turning a wood-focused garage into a metal fab shop.
Total material costs for my 12×16 ft porch hovered around $2,500–$4,000 (steel tubing $5–$15/linear ft, roofing $500–$800, concrete/lumber $800–$1,200), plus tools—far less than pro installs ($40–$120/sq ft). This setup recoups value fast: shade cuts cooling bills, railings boost safety, and the structure lasts 50+ years.
Ready for your DIY backyard porch materials list? Check local codes, source from Home Depot or Metals Depot, and start small (10×12 ft under 200 sq ft often permit-free). Whether best tools for freestanding covered porch or budget backyard covered porch construction materials, this guide equips you for success.